
[bluepost]
Proving Grounds: DPS Silver Trial
Trial Master Rotun: Are you ready to begin the trials?
Note: Choose Start Basic Damage (Silver)
The Silver Trial contains 8/8 Waves, and the difficulty is a bit ramped up. You have less time to accomplish each wave.[/bluepost]
[bluepost]
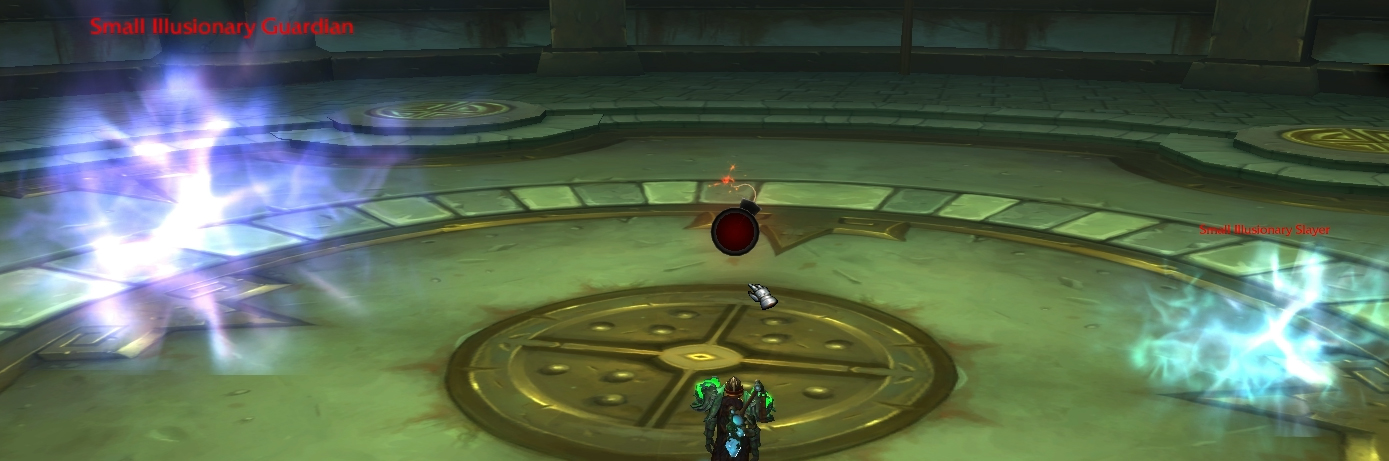
Wave 1
Trial Master Rotun: As before, defeat each wave of illusions before time runs out. This time, you will encounter more difficult illusions.
- Illusionary Slayer (saurok) x 1 – 316K health
- Small Illusionary Guardian (mogu) x 1 – 327K health
Wave 1 consists of only two enemy units. However, they are on opposite sides of the circle. Use your initial burst DPS to kill the saurok which has no plate gear as the mogu does, and has less health than the mogu. You only have 30 seconds to complete Wave 1.
[/bluepost]
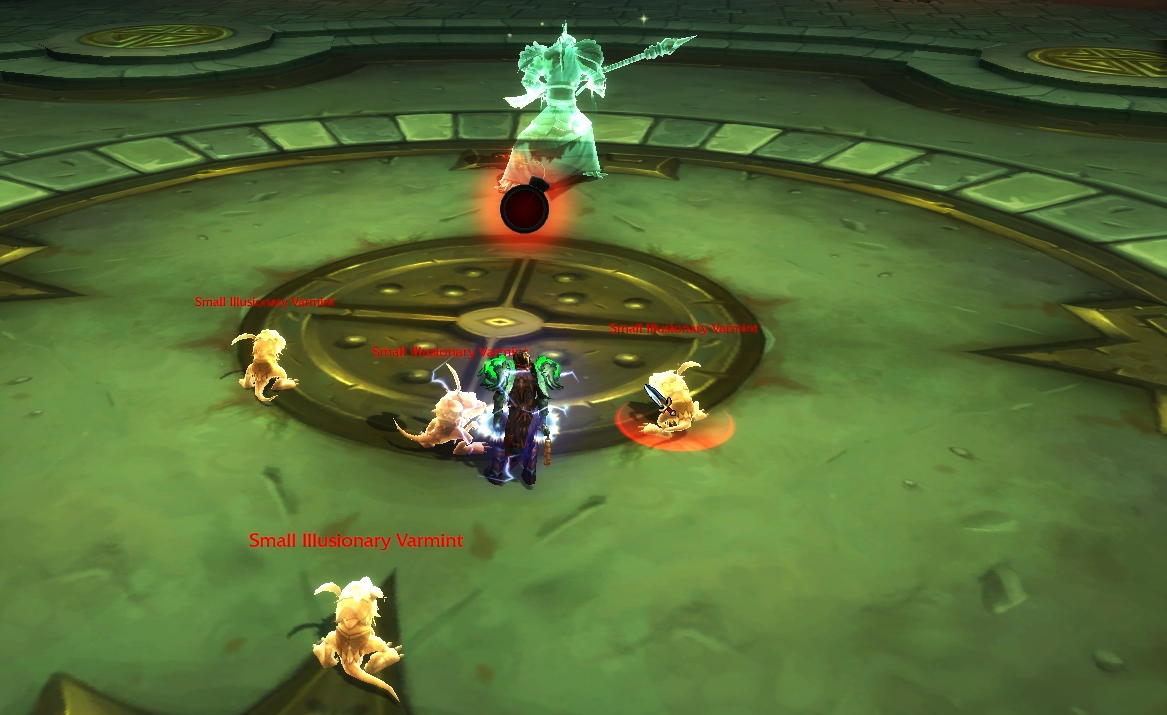
[bluepost]
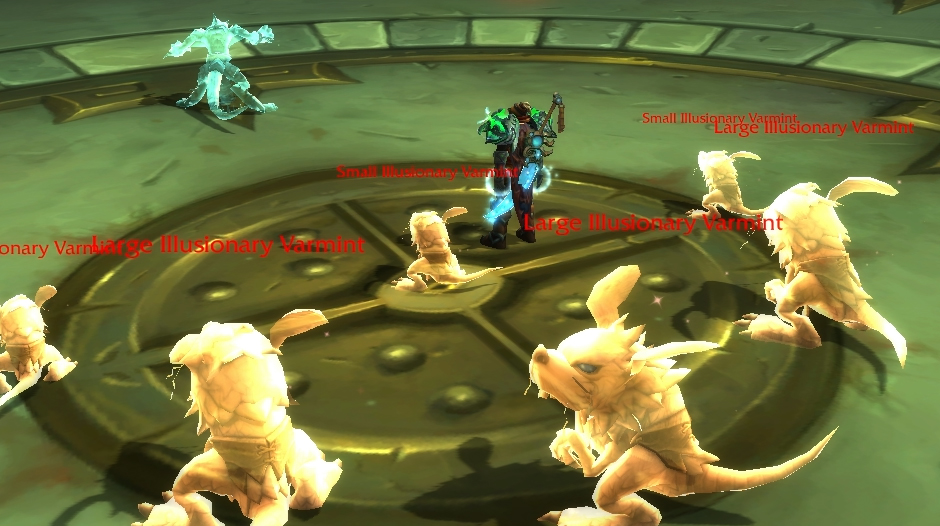
Wave 2
The second wave consists of:
- Large Illusionary Varmint x 3
- Small Illusionary Varmint x 3
- Illusionary Slayer (saurok) x 1
TIP: Before the second wave begins, position yourself at the center of the circle. If you are melee DPS, quickly target the Large Illusionary Varmint at the center and perform any AOE abilities while single-targeting it.
Spell DPS can AOE everything until all the small varmint are dead. If you wish to finish off the larger ones with single-target spells go for it. They should be half-health or less by now. Since the larger ones are in a straight line position, you could also step on the side of one and cast a cone-like spell.
Once all of the varmint are killed, quickly move toward the remaining saurok and dispatch it.
[/bluepost]
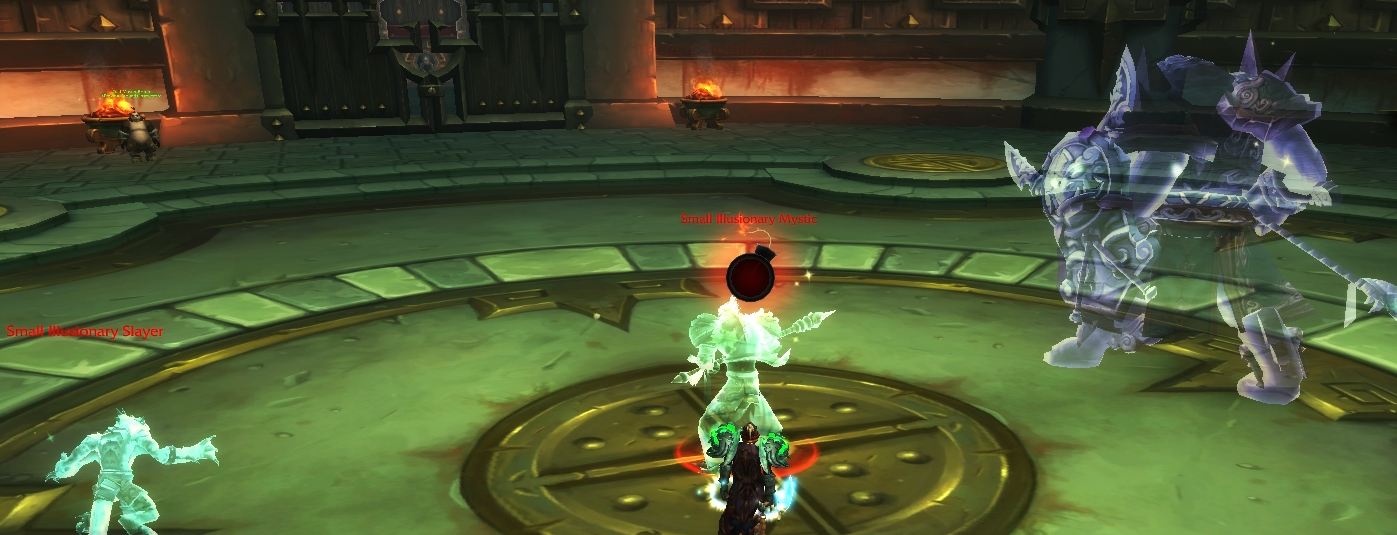
[bluepost]
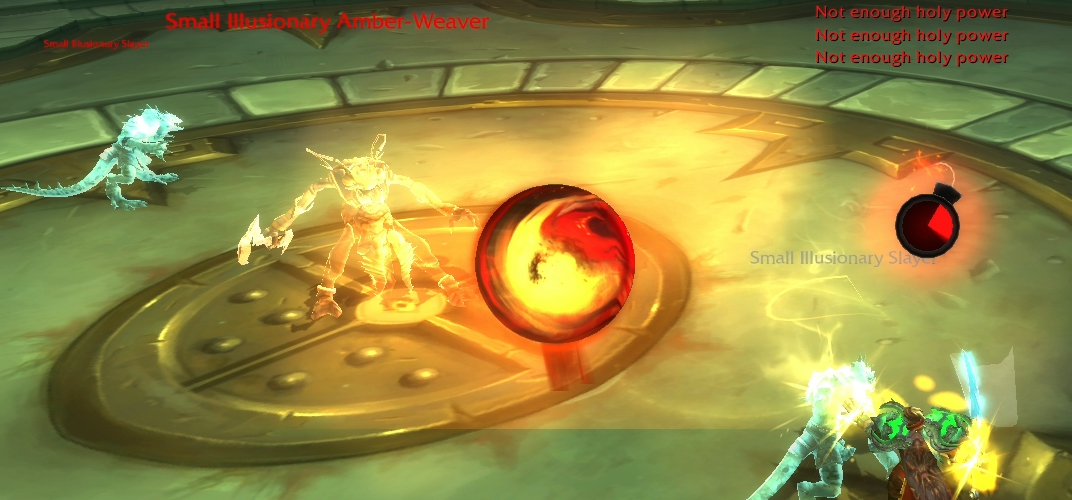
Wave 3
Trial Master Rotun: The Illusionary Amber-Weaver conjures globs of amber that float toward you and explode on any contact. Lead the amber globs into other illusions.
TIPS: This requires a lot of timing and skill. Things can truly go very wrong if you angle your walk-path the wrong way at the wrong time.
For example, the glob of amber will chase you. If you move too fast toward an Illusion to attack it, the glob might hit the Illusionary Amber-Weaver instead. You don’t want this to happen when there is a healer NPC, so practice prudency — there is a countdown timer against you.
A mistake where the glob of amber accidentally hits an NPC might be disastrous in the case of a healer NPC. Be very careful how you path those chasing globs of amber.
In Wave 3 you will find the following units:
- Small Illusionary Slayer x 2
- Small Illusionary Amber-Weaver x 1
These three mobs are standing in alignment — a straight line across the circle’s diameter: Edge, center, edge.
The idea here is to move toward the saurok and to position yourself on the outer circle facing toward the center. That way the glob of amber will hit the saurok. Get a little bit away from the saurok, though. When the glob of amber hits the saurok, it will explode and encase the saurok in an amber prison. It can actually encase you as well if you are too close and this would basically cause you to lose. The prison lasts several seconds.
As soon as that saurok dies, path around the Amber-Weaver — but be very careful not to accidentally cause the glob of amber to encase the Amber-Weaver. Path toward the remaining saurok and position yourself behind the saurok so that the glob of amber hits the saurok rather than yourself.
Next, go attack the Amber-Weaver and be cautious not to be encased yourself. Time is running out. DPS that mantid down before the timer hits 0:00.
[/bluepost]
[bluepost]
Wave 4
In this wave, the player is faced with an AOE challenge with six Varmint bunched up and a mantid summoning globs of amber from afar.
- Large Illusionary Varmint x 3 (203K health)
- Small Illusionary Varmint x 3 (122K health)
- Small Illusionary Amber-Weaver x 1 (526K health)
Position yourself in front of the Small Illusionary Varmint at the center, hit AOE spells to hit all six mobs. Let the glob of amber hit the Large Illusionary Varmint. By now you should have only two Larger varmints. Let the glob hit one, and continue to DPS them.
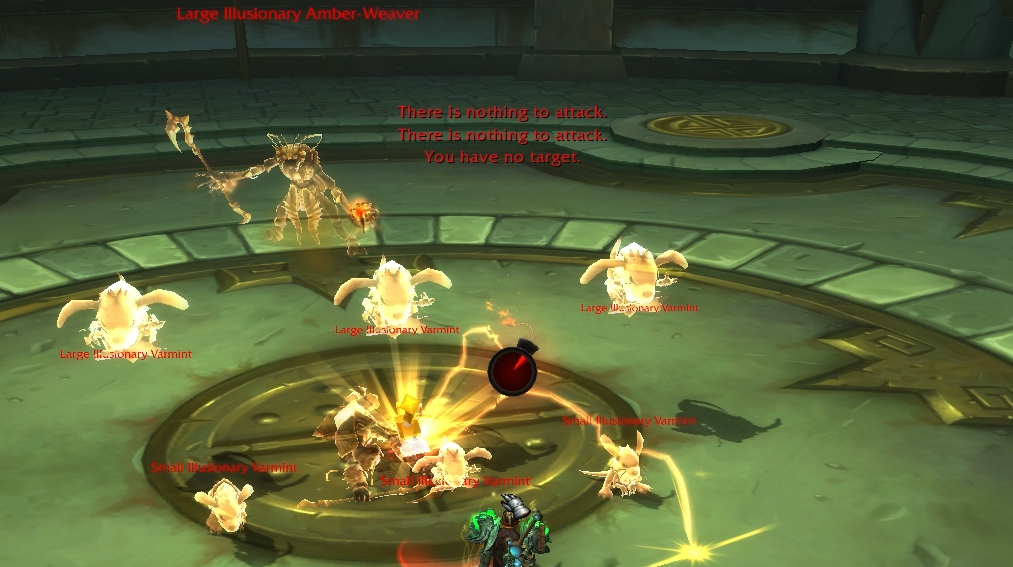
Run toward the mantid and hit it once or twice, while moving behind the mantid to force the glob of amber to hit him. Move away a few yards so that you do not get accidentally encased, and finish the mantid. You might have about six seconds to spare in the countdown timer by now.

[/bluepost]
[bluepost]
Wave 5
Trial Master Rotun: The Illusionary Mystic will heal any ally that is significantly wounded. Interrupt its healing spells.
In this wave, you will find the following units:
- Small Illusionary Varmint x 4 (122K health)
- Large Illusionary Mystic x 1 (1053K health)
TIP: If you have AOE spells that allow you to target an area from afar, I’d recommend dropping that on the Varmints and focus DPS on the Large Illusionary Mystic (Healer). That way the Varmint are taking unattended damage.
They are a bit low on health, so the AOE will get them around half health for when you have to come back to finish them up.
The Healer has 1053K Health which is really a lot. You better have some sort of spell interrupt or two handy.
In my case here, as a Retribution Paladin, rebuke has a 15 sec cooldown. Apparently the healer is silenced for 3 sec with Rebuke. The healer will cast about twice before you kill him — about 17 sec after your first interrupt.
Just don’t forget about the Varmint behind you. Finish them up.
[/bluepost]
[bluepost]
Wave 6
The sixth wave has three units and you only have 55 seconds to complete the wave.
- Small Illusionary Slayer
- Small Illusionary Mystic
- Large Illusionary Guardian
Target the healer first. It has 632K health. Interrupt the heals. He casts every 15 sec after the interrupt.
Move toward the saurok next. It has 316K. The mogu has 545K health. Attack him from behind as his force field will block attacks.
Pretty much a simple wave.
[/bluepost]
[bluepost]
Wave 7
The seventh wave is one heck of a challenge. Nuff said! You have six mobs to deal with in one full minute.
- Small Illusionary Mystic x 1 (632K)
- Small Illusionary Amber-Weaver x 1 (316K)
- Small Illusionary Varmint x 2 (122K)
- Small Illusionary Guardian x 2 (327K)

The first option definitely has to be the healer. It is straight in front of the Small Illusionary Amber-Weaver.
Thus, stand behind the healer to force the Amber-Weaver to encase the healer in an amber prison. Use interrupt spells whenever possible.
Immediately, hit the Amber-Weaver and cast some sort of AOE to get rid of the Varmint. Death Knights and Paladins can target the area and drop their AOE spell on the center while DPSing the Small Illusionary Guardian. Shamans can drop a Lava totem on them. Rogues can Fan of Knives while DPSing the Amber-Weaver. Shadow Priests can mind-sear. Each class can handle this differently.
Time is money, friend. One minute is really short if you think about it, so it is best to watch this video to see what’s going on. Look at the timer. It wasn’t an easy feat for a noob. You have to shell out 1846K damage to six mobs within 60 seconds.
[/bluepost]
[bluepost]
Wave 8
I missed recording the successful final wave. My bad. However, I will show you a failed attempt that was almost successful except for a grave mistake.
I have to warn you. This wave is insane.
On the last wave of the Silver medal trial, you have the following units to deal with:
- Large Illusionary Mystic x 1 (1053K)
- Small Illusionary Amber-Weaver x 2 (316K)
- Small Illusionary Slayer x 1 (316K)
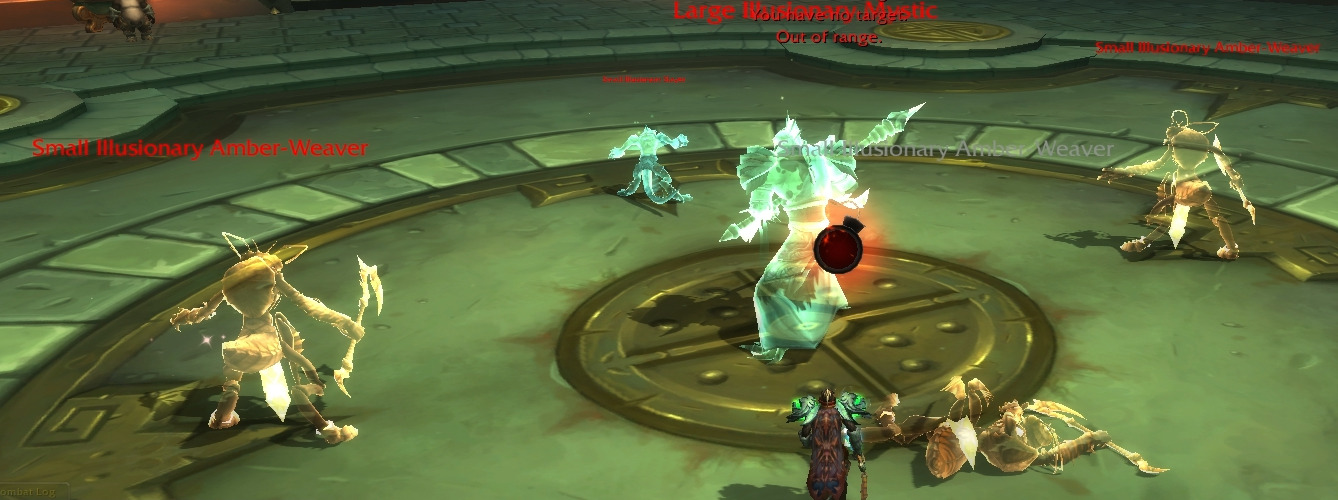
Now here is why this wave is insane. You have a Large Illusionary Mystic (healer) on the center. He has 1053K health, so there is no doubt who you have to kill first.
However, you have two Amber-Weavers on your left and right. Their amber sphere spawns like darn 5 yards away from you on both sides. You have to basically stand in the middle so that they come toward you, and instead hit the Mystic — which is good to interrupt its heals, but you have a very narrow time to move away … remember … those amber spheres can encase you in an amber prison if you are too close to the Mystic.
It’s best to drop some sort of AOE between the Mystic and one Amber Weaver to drop both their healths simultaneously. Remember, you have only 1:05 (65 seconds) to complete this final wave.
At the end of the video, I made a big mistake. Both Amber-Weavers were dead, and I was damaging the last mob: the saurok. One of the Amber spheres was coming toward the saurok, and I didn’t move away fast enough. Four seconds away from victory, in horror my character was encased along with the saurok in an amber prison. Epic Phail! I did manage to win the Silver medal the next attempt I didn’t record.
[/bluepost]


